Intro
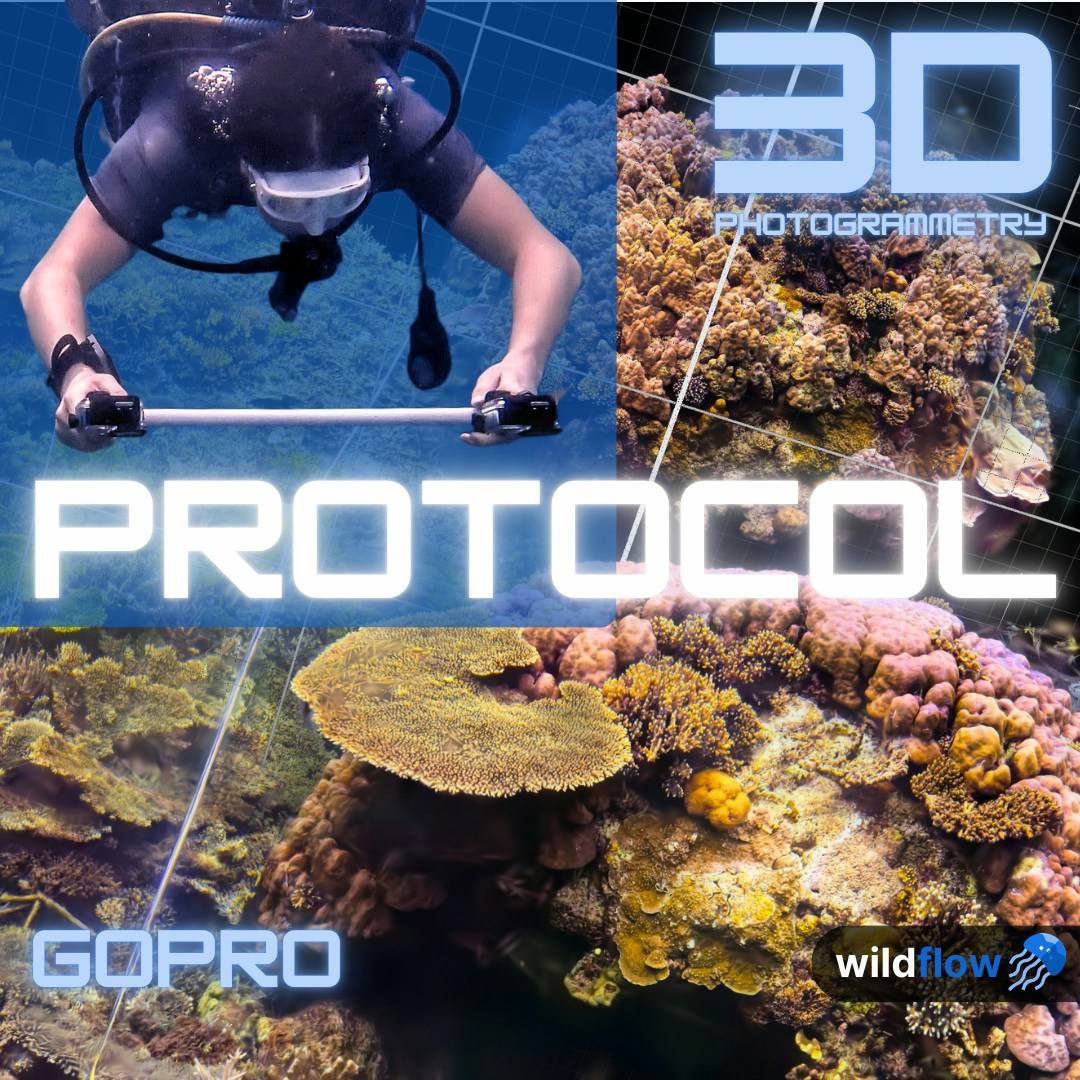
How to capture a 3D model of a coral reef with two GoPros. A simple, low-cost way of creating permanent high-res snapshots of coral reefs for divers using photogrammetry. Data collection protocol. Could be repeated every few months/years. Why? This allows monitoring hectares of coral reefs with sub-centimetre resolution: identifying corals (species/genuses classification), benthic cover (rock, sand), and detecting diseases and their spread. We can track coral demography through time, calculate growth rates and carbonate, and guide human activities to protect, restore and enhance ecosystems at scale. Fusing 3D data with other modalities such as acoustics, genomics and environmental data (water temperature, salinity, dissolved oxygen etc.) unlocks a comprehensive understanding of coral community and ecosystem dynamics, and how to protect and restore the ecosystem. Method. We did not invent this method. It’s a collection of the best practices inspired by the awesome work of the MARS buildingcoral.com team, AIMS, Scripps, University College London, University of Exeter, Perry Institute, Tritonia Scientific and other reef-loving folks. Feel free to follow your favourite protocol. We are just providing a simple end-to-end tutorial on how you can collect the data, so that you don’t have to think hard about all the tradeoffs (we did it for you). If you follow it, we guarantee that we can process the data and reconstruct you a high-resolution model, show changes over time, and provide all the actionable insights. Patch. Let’s call the mapping survey area a “Patch” for simplicty (we’ll use it from now on). We suggest imaging 25x25 metre square Patches — a perfect size for a diving team to explore in one go. If you want to go bigger, go for it! Our system can handle hectares of data from underwater robots. The main limit here is how long the imaging team could stay underwater in one dive. Please don’t push it.Equipment
🔵 Cameras: 2 GoPro HERO 10 or better (example GoPro 13) with accessories:- 2 underwater housings for cameras (example)
- 2 batteries (example) and 1 charger (example)
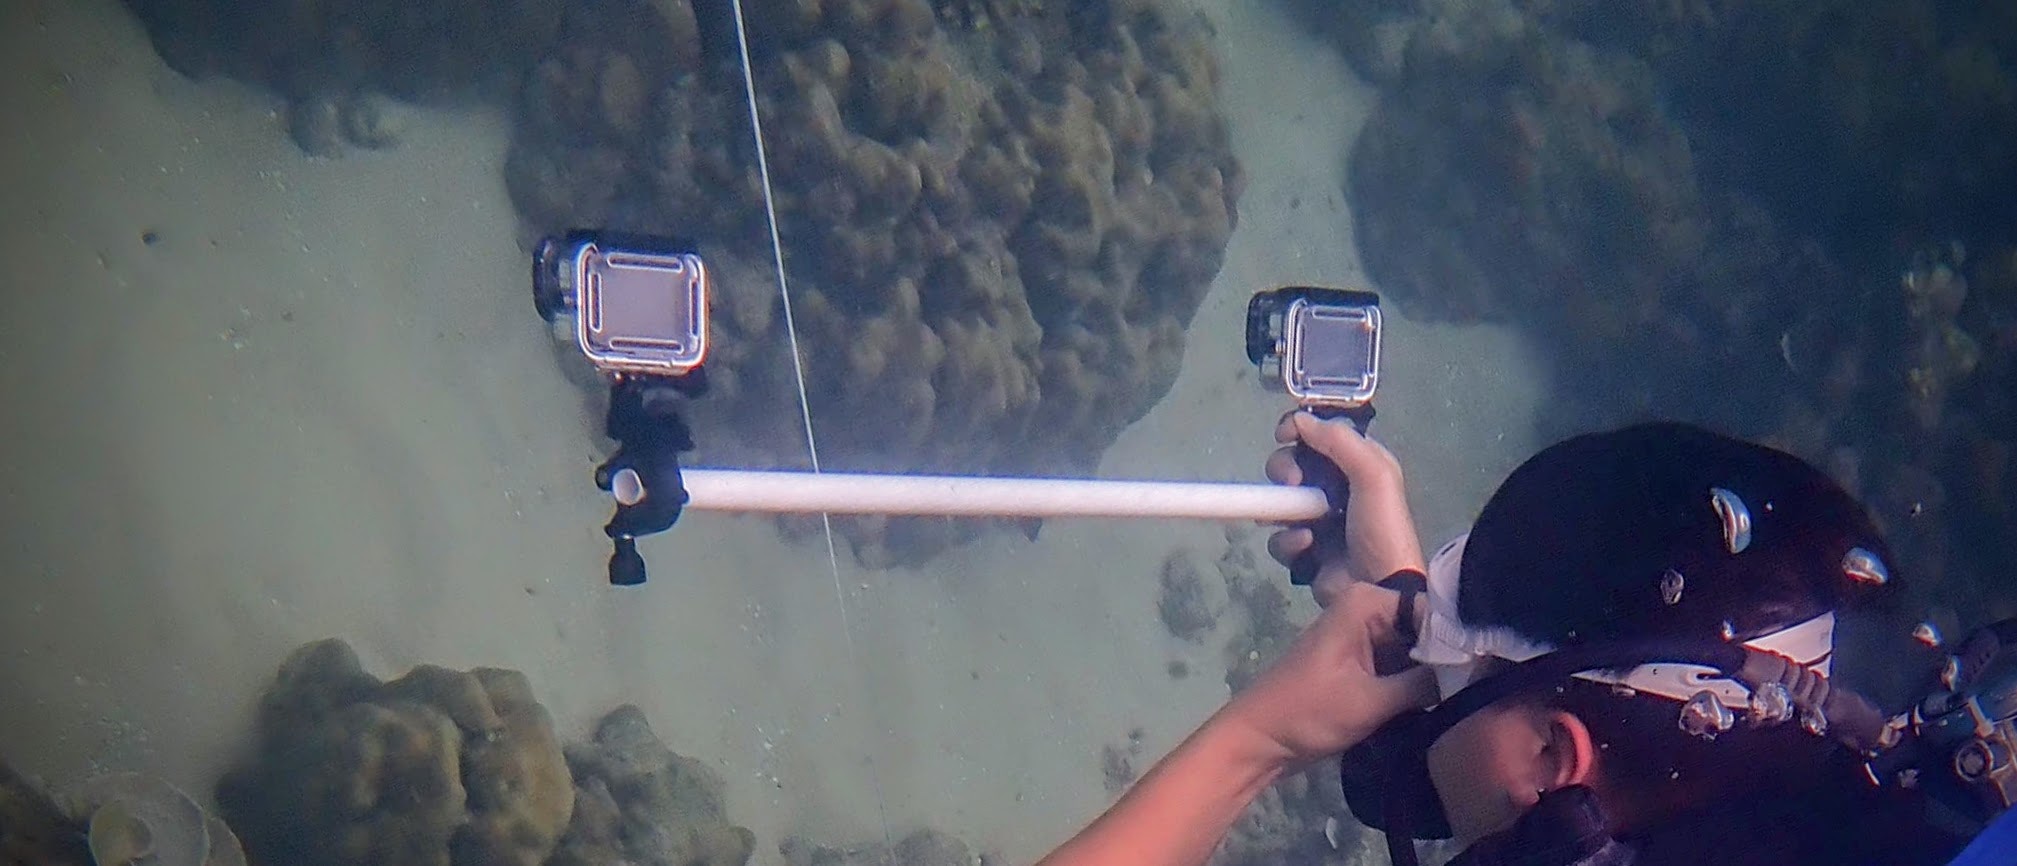
- 2 handlebar mount (example)
- 2+ SD cards (V30 or faster please) A 25x25m Patch requires up to 20GB per camera. A 128GB card is perfect for 6 Patches.
- Best for nature: ideally we should not leave anything. If we use existing permanent objects (e.g. large rocks) it’s the best for the environment.
- Best to find again: metal stakes with a small buoy. The buoy could be underwater close to the seabed, so that tourists wouldn’t steal it.
- Best for automation: make auto-detectable corner markers (great example).
Setup
Let’s set up all the equipment and prepare for imaging. This could be a team of 2-3 divers.1. Camera
🔵 Set the cameras to Photo mode (Wide angle, Superphoto or Normal, best quality JPG). 🔵 Set the interval to take photos every 0.5 seconds.We prefer RAW for better colour correction, but current GoPros can’t shoot RAW
every 0.5 seconds (the shortest interval is 3 seconds). If your camera can
shoot RAW, use it, but note it takes up more space.
2. Corner Markers
If you’re doing a repeated survey and already have Corner Markers installed, just locate them underwater using GPS and snorkelling. You can skip this section and move to Transects. Otherwise, follow the steps below to install them. 🔵 Choose a site that needs to be mapped. Think about how the Patch will be located and where its sides will end up. 🔵 Install 4 Corner Markers to define the survey area. This is usually done together with laying out Transects.It’s helpful to set up an SMB at one of the Corner Markers (on the deeper end)
so you can easily find a starting point for imaging and signal boats that
there are divers here.
3. Transects
🔵 Lay out outer Transects to form the perimeter of the 25x25m Patch. This can be done while installing Corner Markers. Ideally, align the sides of the Patch with cardinal directions (North/South or East/West) or parallel to the shore. Use a Compass to navigate and make 90-degree turns. A snorkeller can help guide this process from the surface. When laying Transects, thread the tape measure under a rock or a coral structure (non-destructively) every 10 metres to keep it from fluttering. 🔵 Lay out inner Transects every 5 m intervals within the 25x25m box. It should look like swimming pool divider lines.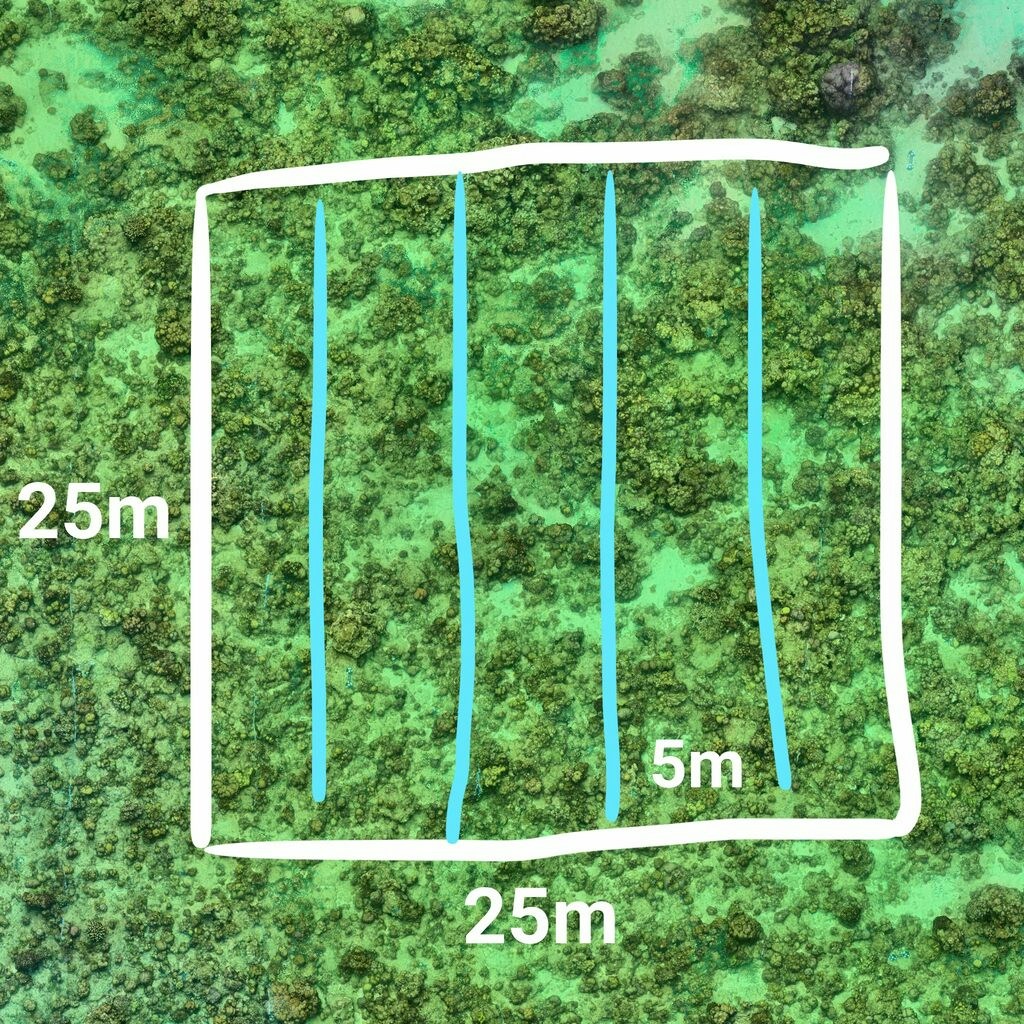
You can set up multiple Patches next to each other. This reduces the need for
permanent Corner Markers and saves time by doing them all at once.
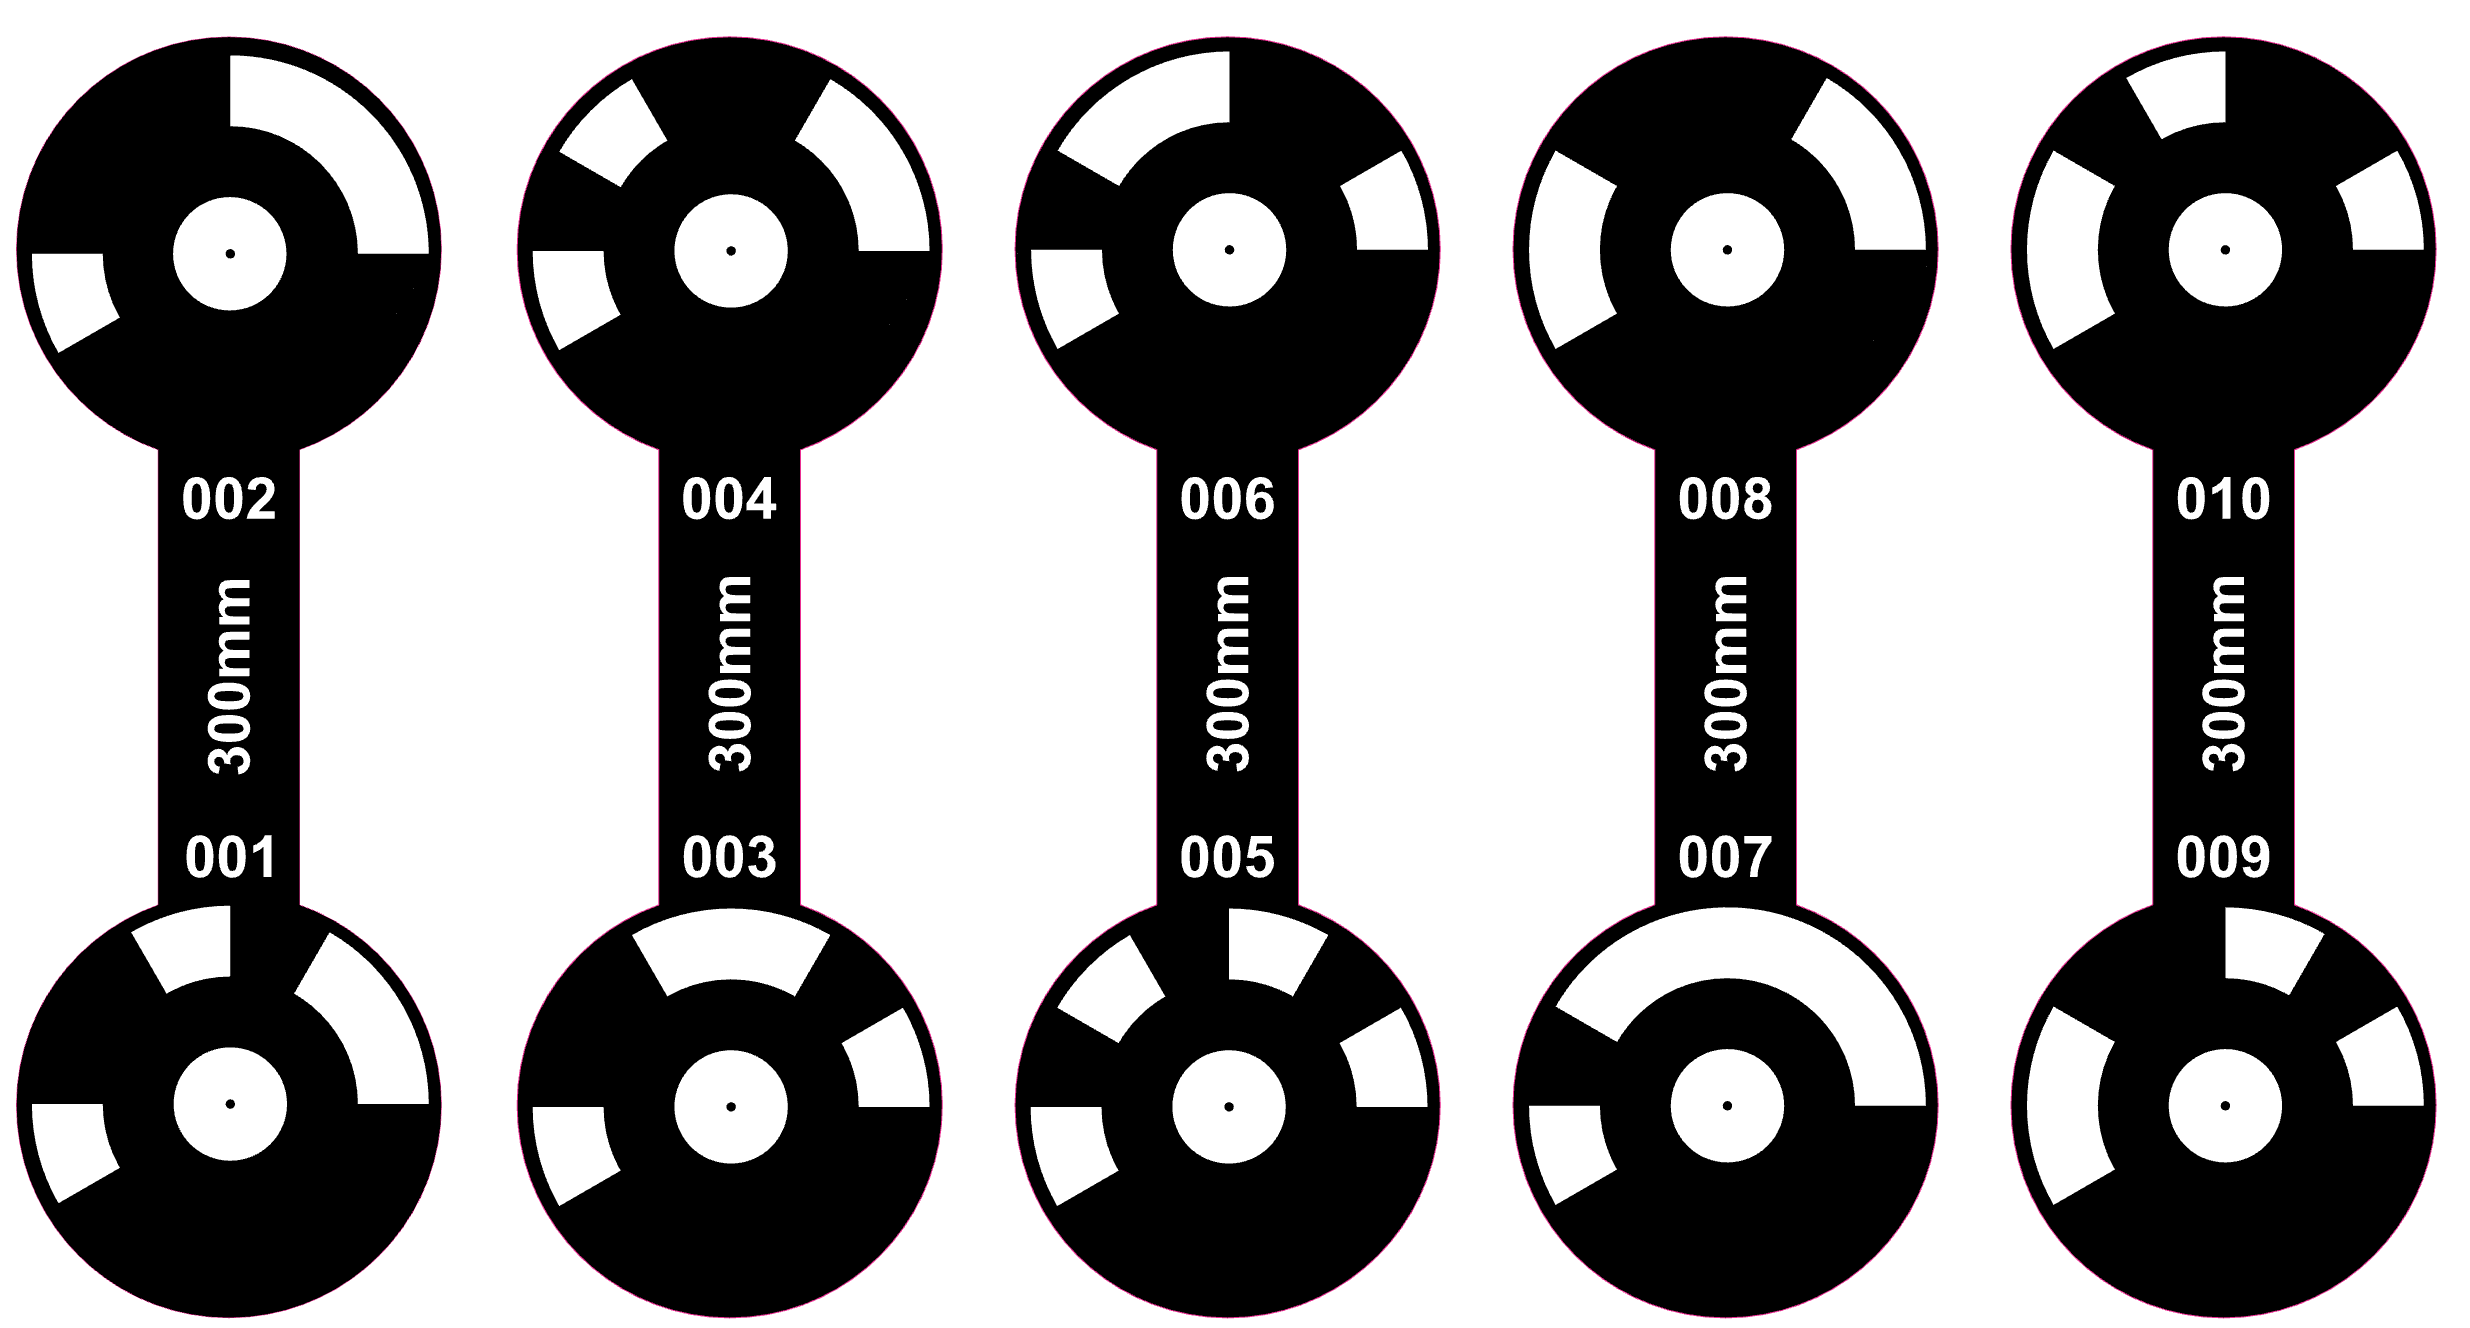
4. Scalebars
🔵 Evenly distribute Scalebars across the Patch. For example, place 4 in the corners and 1 in the centre. Ensure they’re visible from different sides. 🔵 Place Colour Charts near Scalebars so they’re easy to find. 🔵 Measure the depth of each Scalebar using your Dive Computer. Place the computer on the marker and note the depth, or take a photo for reference. Record the Scalebar identifier code and depth, e.g., ‘007 - 3.5m’.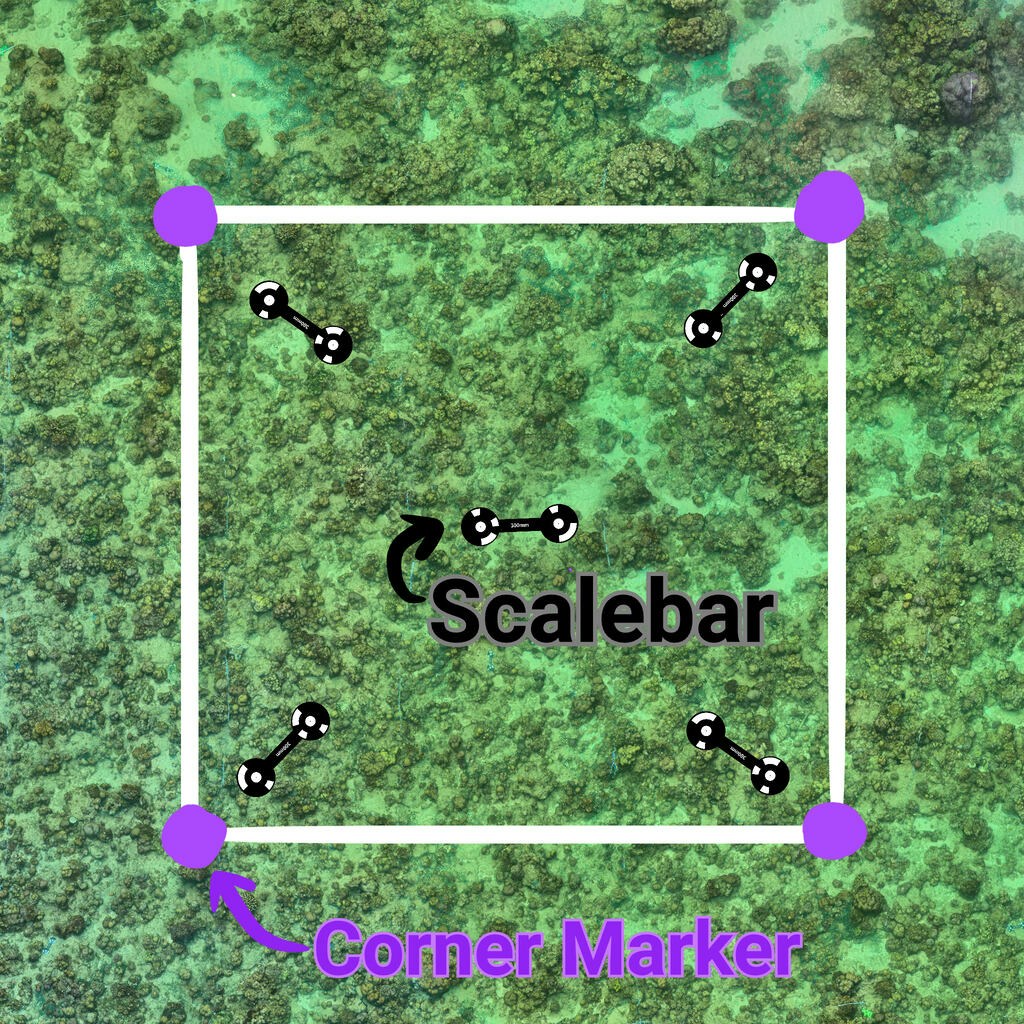
Imaging
Let’s map the reef! This can be done by a second team of two people, or by the same team if you don’t have enough divers. Follow these steps to take photos with two GoPros and create a 3D model of the coral reef.1. Camera Setup
🔵 Find the starting point — usually one of the corners on the deeper end. If there’s an SMB (Surface Marker Buoy), start there. 🔵 Check the camera rig is stable and both cameras are facing downs. 🔵 Turn on both cameras before descending. Make sure they’re set to Photo mode, taking pictures every 0.5 seconds. 🔵 Press the record button on both cameras once you’re underwater and ready. It’s okay if they’re not perfectly synchronised. 🔵 Confirm both cameras are working. Ensure the photo count number is increasing on the screen or whether there is a blinking red activation light.2. Positioning
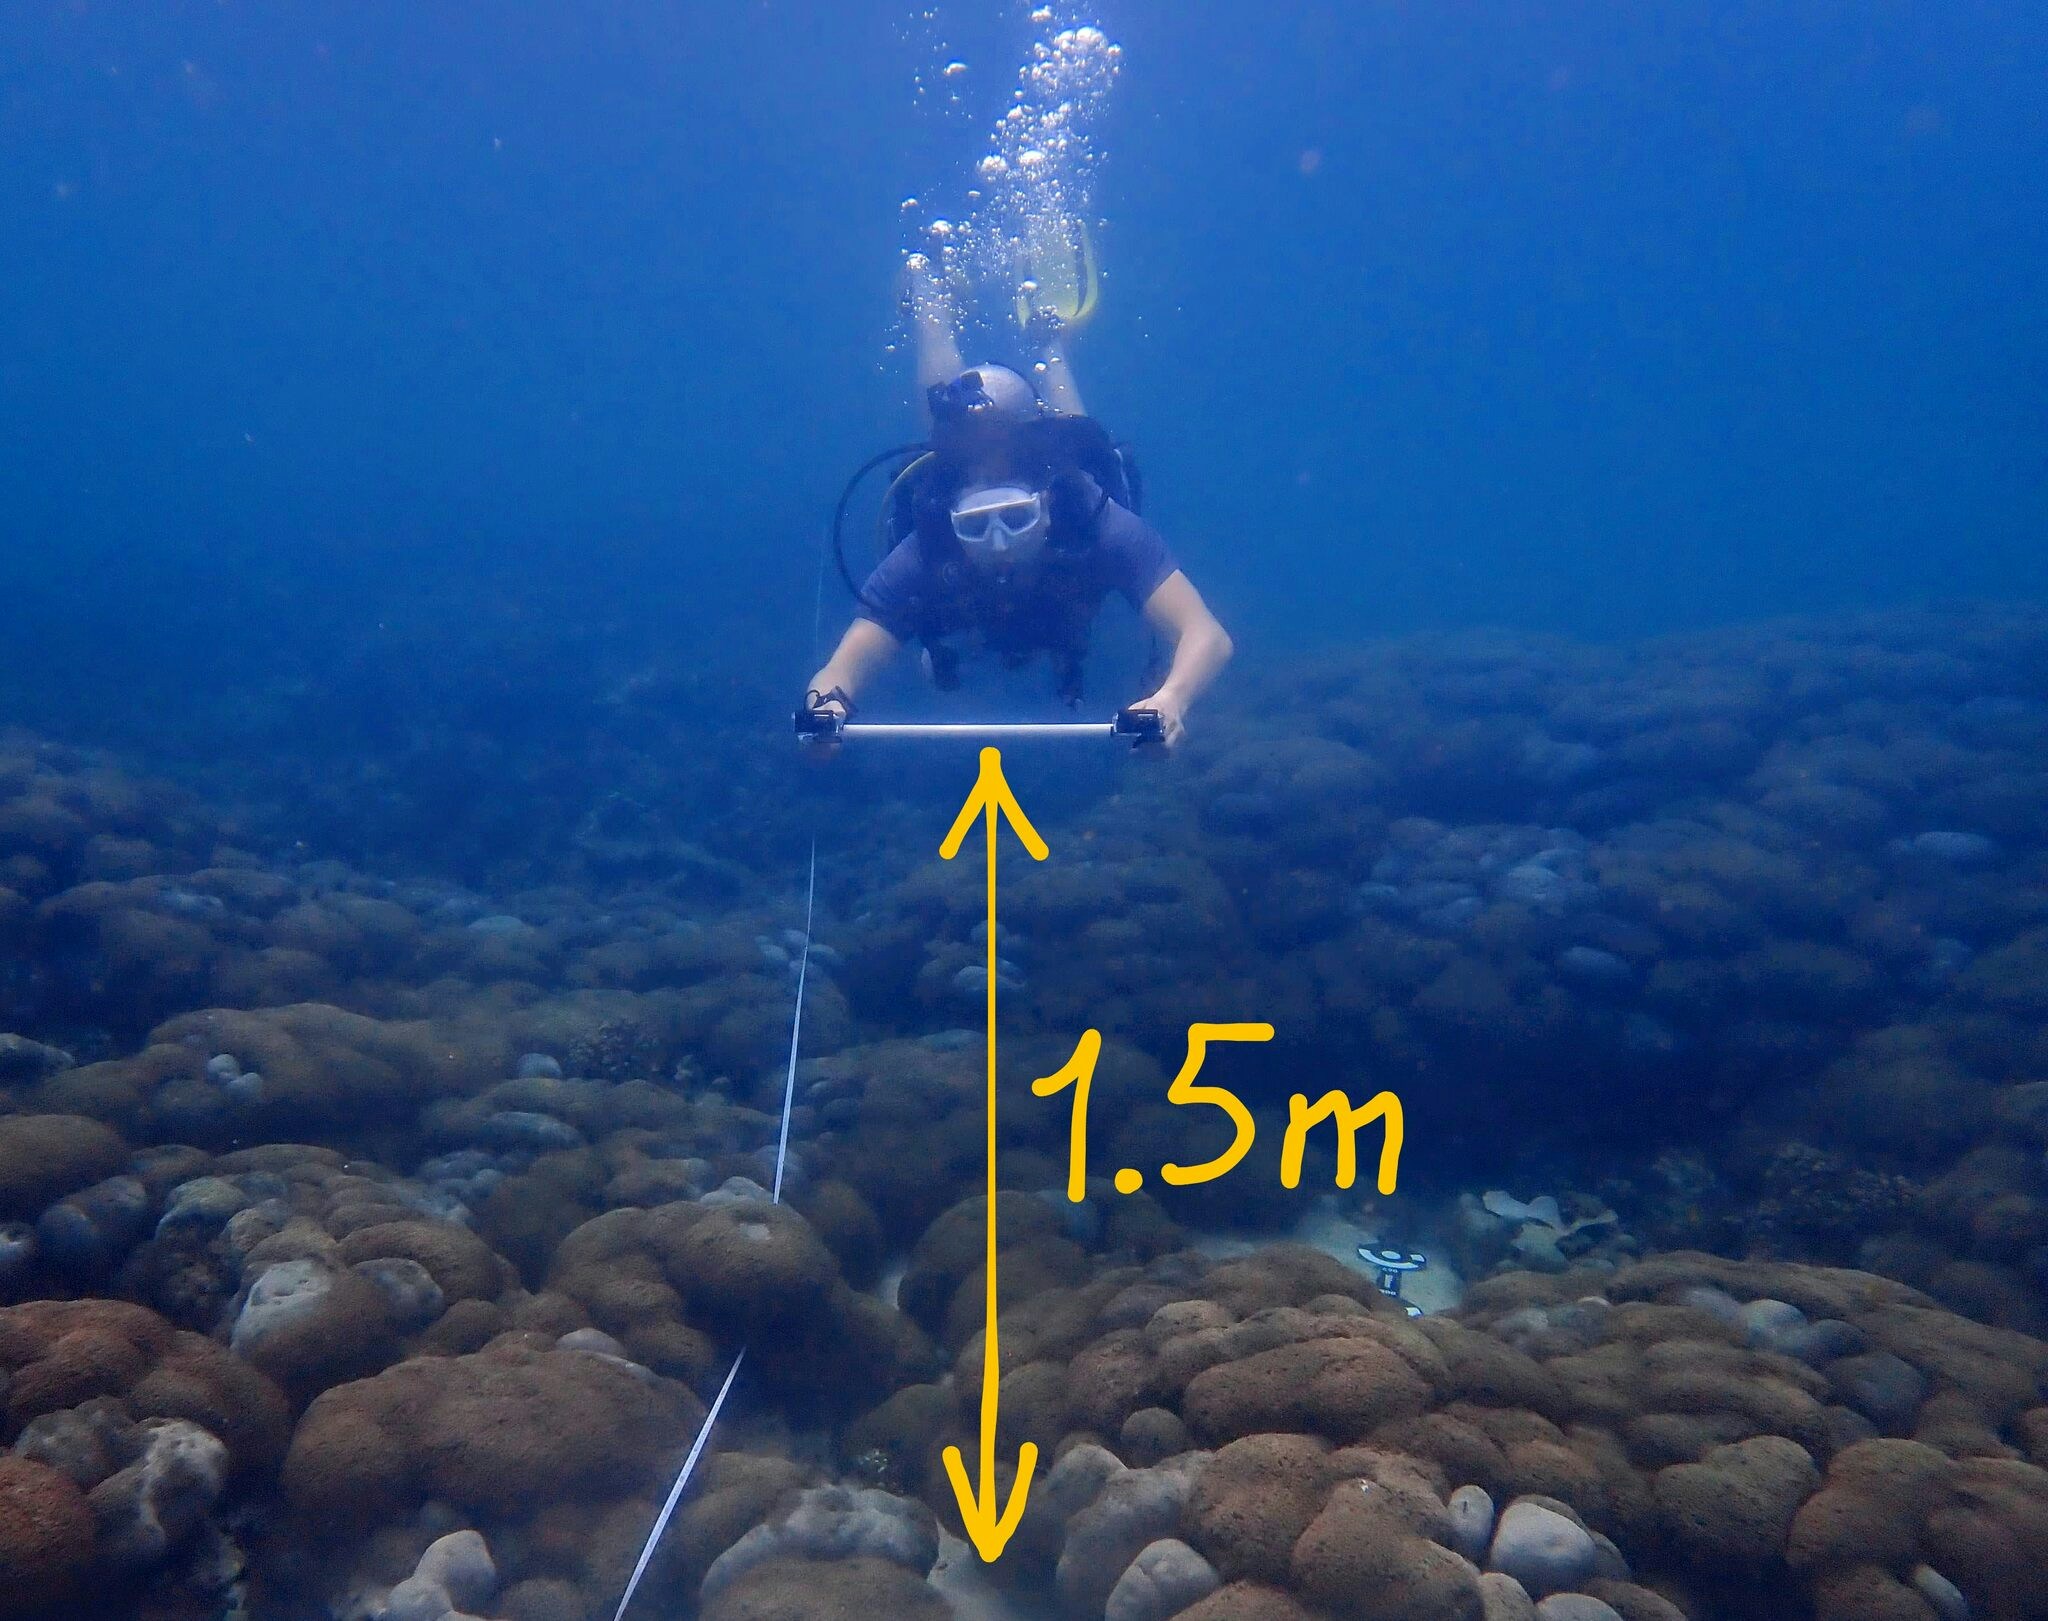
🔵 Hold the camera rig in front of you, keeping both cameras pointing straight down to the coral substrate. 🔵 Stay 1-2m above the reef, aiming for 1.5m. This keeps everything in focus.Everything farther than 31 cm (12 inches) will be sharp / in focus in GoPro.
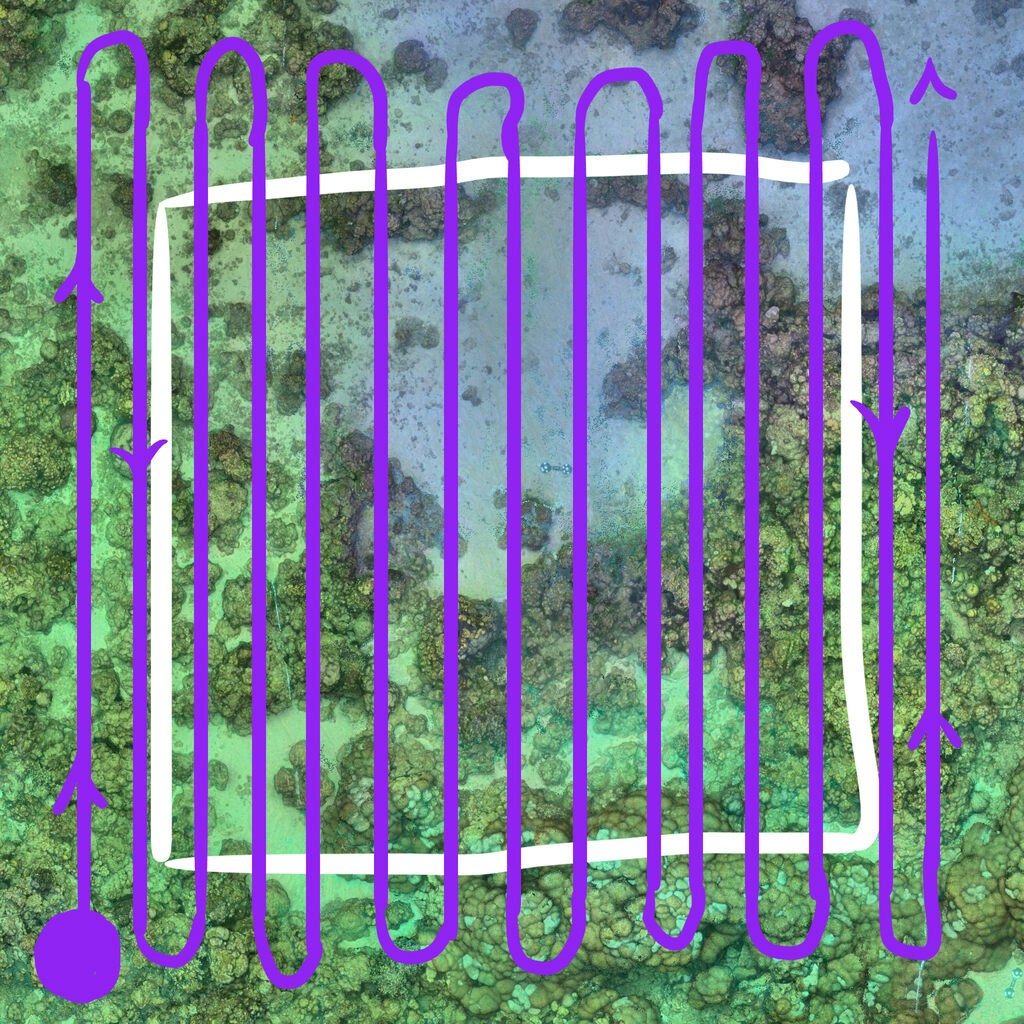
3. Swimming Pattern
🔵 Start and end outside the edges by 1.5-2 metres to ensure full coverage. 🔵 Swim in a lawnmower pattern: go back and forth across the area, like mowing a lawn, until you’ve covered the entire reef. You don’t need to return to the starting point — just finish once the whole area is photographed. 🔵 Keep each swim line about 1.5m from the last one. This ensures photos overlap without too much duplication. 🔵 When turning, swim a bit farther out (1.5-2m) beyond the Patch edge to avoid gaps. 🔵 Swim at a steady speed (0.5-1.5 m/s), but slightly slow down when capturing detailed areas and speed up when covering simpler areas (totally optional). 🔵 Check every few minutes that both cameras are still recording. Look for the red light blinking every 0.5 seconds. The screen will be black, so rely on the light.Think of it like spray painting the reef — you want to cover every part
without missing spots.
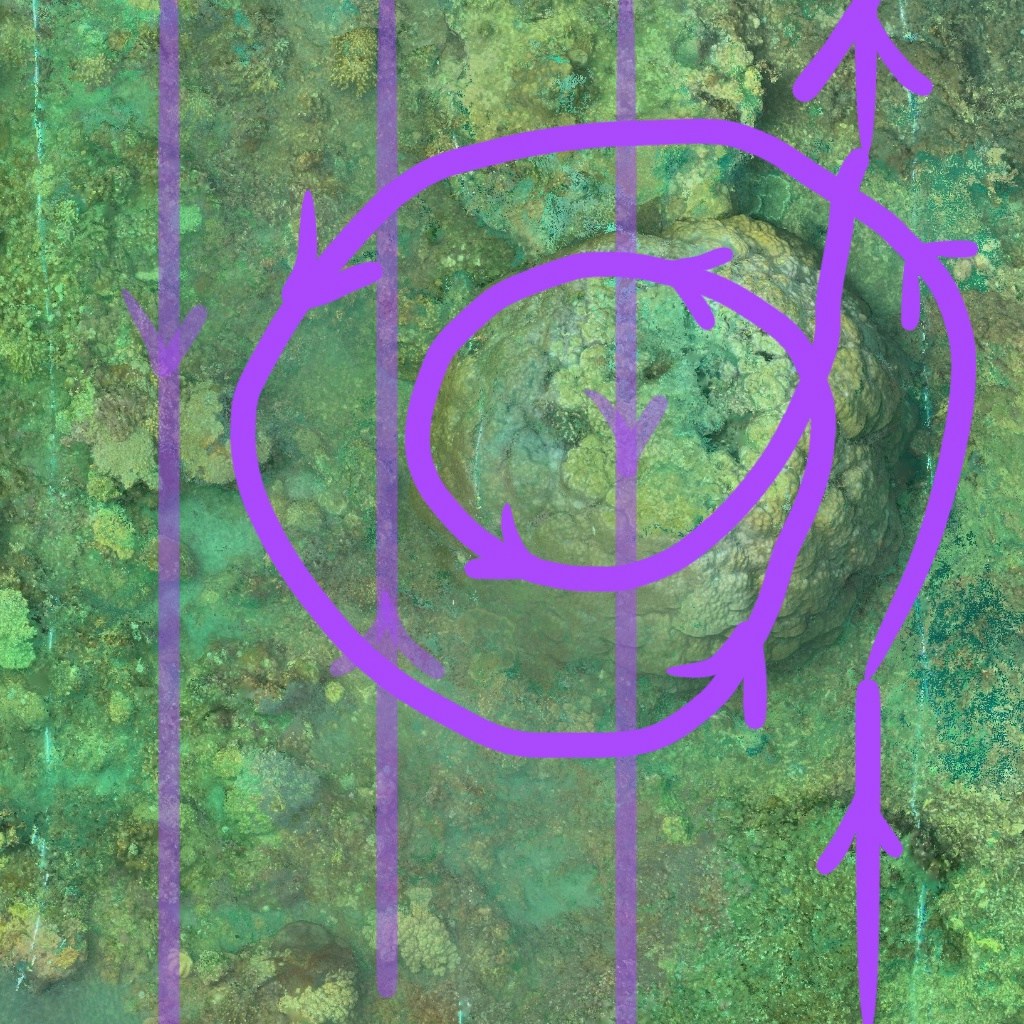
4. Large Colonies
🔵 When you encounter a large coral or complex structure during your swim pattern, swim over it as part of your regular back-and-forth lines, then pause briefly to swim in circles around it. It helps if you can mark where you start swimming around it, as this can inform you where you need to resume swimming when you have finished capturing the structure. 🔵 Tilt the cameras towards the structure while circling to capture its sides. 🔵 Do multiple circles at different heights if it’s tall or intricate. 🔵 Resume your regular swim pattern right after, continuing where you left off.This ensures the 3D model includes all sides of big or complex features
without breaking your overall coverage flow.
5. Finishing Up
🔵 Stop recording on both cameras once you’ve covered the entire area. 🔵 Turn off the cameras to save battery.Cleanup
🔵 Ensure you have all necessary data: Confirm you’ve captured GPS coordinates of all Corner Markers and depths of Scalebars. 🔵 Collect all temporary equipment: Gather Scalebars, Transects, and the SMB. Make sure to leave only permanent Corner Markers behind.Double-check the area to ensure no equipment is left behind. Protecting the
reef means leaving it as you found it, or even better, pick up any rubbish you
spot, etc!
Upload
Now it’s time to turn your hard work into a 3D model! You can process the data yourself, or let us help. Simply navigate to wildflow.ai/upload (coming soon) and follow the instructions. A typical 25x25m Patch requires about 10-20GB of data, which usually takes around 30 minutes to upload (depending on your Internet connection). Once uploaded, processing takes a few hours, and soon you’ll be able to explore your reef in stunning 3D detail right in your browser.Watching your reef come to life in 3D is incredibly rewarding. You’ll see
every coral, every nook, and every cranny — it’s like diving without getting
wet!
Tradeoffs
Modern Structure-from-Motion (SfM) photogrammetry has been a game-changer for over a decade, and there are many ways to collect data. Our protocol is designed to balance simplicity, cost, and effectiveness, but it’s worth understanding the tradeoffs involved:- GoPro’s Rolling Shutter. GoPros use a rolling shutter, meaning each row of pixels is captured at a slightly different time. This can cause slight distortions in fast-moving scenes, but for coral reef mapping, where movement is slow, it’s rarely an issue. We’re talking centimetre-level accuracy here, not millimetres. Thanks to Will Greene for highlighting this!
- Two Cameras to Avoid the Bowl Effect. Using two cameras helps prevent the bowl effect — a distortion that can occur when mapping large, flat areas with a single camera. The dual setup ensures your 3D model stays accurate over the entire Patch.
- Transects for Navigation. For a 25x25m area, Transects help you stay on course and avoid gaps. If you’re mapping a smaller area (like 10x10m), you might get away with a reciprocal zig-zag pattern, which is more forgiving in terms of coverage holes, but requires twice the swimming effort. We’re also exploring alternative methods, like mid-water buoys, lasers, or real-time SLAM apps to ensure full coverage. Stay tuned for future protocols!
- No Triad Marker for Orientation. Usually, people use a triad marker to define vertical direction, making it easy to align orthomosaics with a consistent normal vector. We skip that hassle and instead co-register 3D models using permanent common points-like stable rocks, not living coral that might grow — ensuring everything stays self-consistent over time. For vertical alignment, we rely on the depth from Dive Computers on Scalebars, with about a 25cm error. That’s probably fine for a 25x25m area, and the big win is we avoid lugging around that awkward triad-traveling with it is a nightmare, and building one is a pain!
Every choice in this protocol is about making reef mapping accessible and
effective. You’re not just collecting data — you’re creating a digital twin
of the reef that can be studied, shared, and preserved for years to come.
Alternative Protocols
Feel free to use your favourite data collection protocol.- Gordon S., Aston E., Lechene M., Harianto J., Bray P., Figueira W., Gonzalez Rivero M., Ferrari Legorreta R. (2023) Field photogrammetry in 4D. Reef Restoration and Adaption Program (EcoRRAP). Standard Operational Procedure Number 1: Overview and in-field workflow. Australian Institute of Marine Science, Townsville. (62 pp) https://doi.org/10.25845/SE7T-PS86
- Bayley DTI, Mogg AOM. A protocol for the large-scale analysis of reefs using Structure from Motion photogrammetry. Methods Ecol Evol. 2020; 11: 1410-1420. https://doi.org/10.1111/2041-210X.13476
Thanks!
Thank you for being part of this incredible journey to map and protect coral reefs! Your efforts help scientists, conservationists, and communities around the world understand and safeguard these vital ecosystems. Every photo you take is a step toward a healthier ocean — and that’s something to be proud of.Feel free to ask questions or share your experiences in our
Discord — we’d love to hear from you!